¶ Eyes and Eyelashes
Brush up the eyes!
¶ Eyes

Under Head you can find Eyes.
Within Head > Eyes lies the options for recolouring, re-texturing and just managing the edits done to the eyes.
- EyeScale Scales the eye. Some head tweakables also size the eyes bigger or smaller. Certain tricks with Custom offset also resize the eyes.
- EyeNudge lets you move the eye. Drag on the X Y Z boxes to move the eye in those directions.
- Heterochromia lets you enable/disable different eye colours per eye.
- IrisColor lets you change the colour of the inner eye.
- ScleraColor lets you change the colour of the outer eye.
- IrisSize scales the Iris
- IrisGlow scales the level of glow in the Iris
- EdgeSpecular controls the glossiness in the eyes (to the sides) when viewed at an angle.
- ScleraGlow like IrisGlow, makes the outer eyeball glow as well.
- PupilSize resizes the Pupil
- IrisTexture lets you change the eye. Iris Texture only accepts a Normal Map in the power of 2 resolution (512x512 or 1024x1024 etc).
If you want some inspiration and idea for how to make your own eye texture, visit: [Make a new Eye texture]
Tip: Depending on what style of a look you are going for with your character should determine how exactly you use these Sliders. You can completely force away the Iris by making the Iris Size smaller than the Pupil Size. Resulting in only leaving in the Pupil. That way, you can make a cartoony look in the eyes of the character.
Tip: Generally, EdgeSpecular can leave an eye look attractive with its subtle glossy look. However, it might be just too glossy for the look of your character or in general. For Dark Eyes, this can especially be the case, so keep in mind to turn down EdgeSpecular whenever the eyes (especially ScleraColor to black) are dark.
¶ Eyelashes

Under Head you can find Eyelashes.
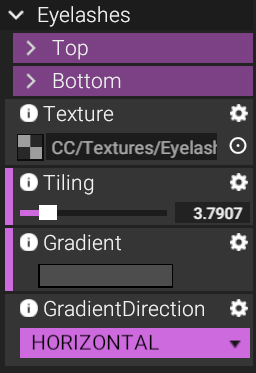
Within Head > Eyelashes lies the options for shaping, lengthening and colouring the Eyelashes.
- Texture Lets you change the Eyelash texture. It only accepts Mask Textures (Black and White).
- Tilling tiles the looping texture. The more tiling, the more times it repeats.
- Gradient references the Gradients Index in Coloration > Colors. Click the box to choose a new Gradients.
- GradientDirection simply lets you control the method at which the gradient is applied on the Eyelash. (We recommend Vertical).
There are Top and Bottom options at the very top that you can expand.
They reveal extra options on the Top Eyelashes, and the Bottom Eyelashes.
- Rotation X, Y Sliders simply lets you rotate the Eyelashes in their directions.
- Curve slider curves the Eyelashes Vertically.
- Length makes the Eyelashes longer
- LengthDistribution forces the Eyelashes at a certain maximum length, distributed horizontally (along the eye).
- SpreadAngle widely and Horizontally curves the Eyelash. From the middle and out or in.
- SpreadDistribution set the amount of maximum spread that SpreadAngle affects. Distributed horizontally (along the eye).
Tip: With a good Eyelash texture, setting the Tilling to something low will make the new Eyelash texture more clear to see.
Tip: It helps to imagine the LengthDistribution or SpreadDistribution curve editors as affecting the eyelashes horizontally in the horizontal grey box that you are editing the curve in. It can help you visualise how the Eyelashes can shape up based on how you make the curves, curve.
Next Page [Tongue Editing]