¶ Appendages - Model
Models of the Appendage variety is a feature that lets you add numerous models of the same kind very easily.
The model themselves is recommended to be a low quality mesh in order to not exceed any character upload limit.
These Appendage Models are often used for details such as small spikes, horns and teeth.
As always, it can be whatever you want.
You add a Model Appendage by clicking the + icon on Decorations > Appendages, and choose Create a Model Group.
Parts also have this feature.
¶ Sculpt Tool

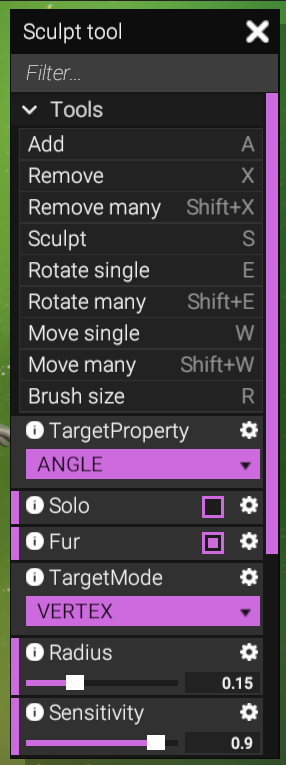
When adding a Model Group and selecting it, the Properties will change as well as a new window called Sculpt tool will appear.
The Sculpt Tool window is for directly making edits to the Model group on the character or part.
- Add sets you in add mode, places a Model when clicked on the character.
You can also click(hold) and drag a direction to have the added model rotate to the desired direction before placing. - Remove sets you in Remove mode, highlights a Model piece in red when hovering over a piece.
- Remove Many targets any in the size of the brush to be removed on click.
- Sculpt is the most important tool. Sculpt lets you make the TargetProperty have an effect on the Model piece in a brush.
Click+Hold and Moving the mouse adds the effect while Ctrl+Click+Hold while moving adds the effect in the other direction.
Shift+Click+Hold while moving homogenizes the the effect to be similar to others, otherwise called smoothing. - Rotate single highlights a Model piece in red when the mouse is hovered over it to then be selected (Click+Hold) and dragged around.
- Rotate many lets you select and rotate all in the size of the brush (Click+Hold).
- Move single lets you highlight a Model piece in red to then select and move around (Click+Hold).
- Move many lets you select and move all in the size of the brush (Click+Hold).
- Brush Size sets you to resize the brush by moving the mouse in or out, click to confirm.
Target Property has many modes. These modes need Sculpt to give its effect to the Model pieces.
- Size increases the size of the model proportionally
- Tilt Rotates the model in the third Axis. This is essentially Rotation at an angle normal rotation does not.
- Surface_Offset floats or pushes the Model pieces into its surface or out of its surface.
Target mode lets the brush either target the Vertex or Roots of the Model piece.
Depending on the situation, change the setting, but generally suggested to keep it at Vertex.
The different sliders lets you edit your brush and how it affects and edits.
Tweak these settings to your liking.
- Radius sets the brush size. Quickly accessed with the R hotkey.
Additionally, the brush size is dependant on the camera positioning, as in, the brush size never changes its size as you move further or closer to the subject.
It stays intact according to you, and as such depending on your distance will envelope its Model pieces wherever the brush lies.
A pseudo method to sizing your brush. - Sensitivity governs how much to affect when Click+Hold+Moving the brush across the Models.
Have low sensitivity when doing fine details with the Model. - Value is the more meaningful aspect of how much to affect the Model pieces when brushing them.
- Opacity is how much the brush takes effect from its edges to the middle from the Falloff curve.
Blend modes is simply Smoothing, adding, subtracting etc.
- Add_Subtract should be your default as it lets you add (click...), and subtract (ctrl+click...) the effects when sculpting.
- Replace I dont know
- Multiply I dont know
- Smooth is quickly accessed when holding shift+click. It homogenises the affected Model pieces to be similar (In the selected Target Property).
Falloff curve lets you decide how the brush actually looks like when making effects.
Setting the maximum affection down to its minimum. From the middle, to the edges and further out.
¶ Properties
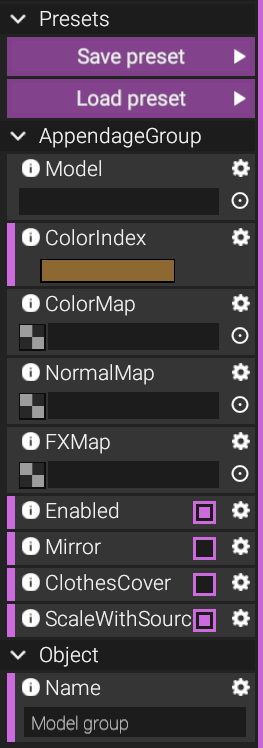
When the Model group is selected, the properties change for important features that adds to the Model.

- You are allowed to save the preset of the Model Group (Placement, amount etc) and load one into a character.
Although model, color map, normal map, fx map need to be re-applied. - ColorIndex simply lets you choose color from your color palette.
- ColorMap is where you upload a Coloured textured made for the uploaded model.
- NormalMap is the normal texture for the uploaded model.
- FXMap Adding in one of the 4 extra textures when uploaded a texture as a MAP, also has an RGB variant. Each variant will add an Effect (FX).
R = Emission
G = Smoothness
B = Metalic
A = Alpha
So, when you desire your model group to have a certain look to them, FX map allows you to set one of these 4 effects.
- FXMap Adding in one of the 4 extra textures when uploaded a texture as a MAP, also has an RGB variant. Each variant will add an Effect (FX).
- You can Enable or Disable it via a check mark, as well as Mirror which it then mirrors along the X axis.
- ClothesCover check mark allows the Model to be covered by garment when garment covers over the Model roots.
- ScaleWithSource proportionally scales the Model to the overall size of the object by default
In the case that applied Model is too small (usually on a part), uncheck this to make the Model behave independently from the source in terms of size. - As always, you can name the Model group and is wise to do so.
Usually contextually to what the Model was used for.
Next Page [Fur Authoring]