¶ Making Custom Offsets
The Fvne plug-in for Blender is required for this one. You can find it [Here]
Custom offsets is a way to edit the shape of your character using Blender (a free external 3D application) and then bring it back again into FurryVNE, allowing you to create mostly any character you want.
Here is an example of a character who originally has the in-built Cow head selected, turning into a monkey!

To make edits in your model, you must first do the following:
- In the Outliner, Advanced > Custom offset, you will see an "Export" button in the Properties.
- Keep Inflation and Skinned check-marks checked and hit Export.
- Save the file somewhere you will find later.
It is recommended that you have a "Custom offset" folder, and within that folder you can save your Blender files, and also have 2 more folders within the Custom Offset folder called: "From FVNE to Blender" and "From Blender". Keep the fvne.offsets files within these two to separate and know which offset file is which, which to import from and which to export from. - In Blender, with the plug-in installed go to File > Import > FurryVNE_Offsets and open the file you exported from Fvne.
The character should now be in the Blender Workspace.
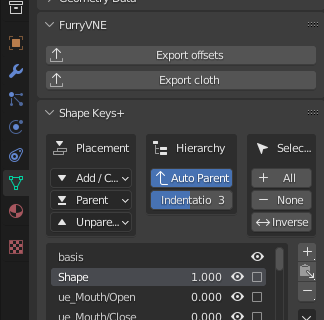
Within Object data Properties you will use the Shape Keys found within.

Do not edit within Basis. Instead, edit within Shape.
- You can use Sculpt or Modeling mode to make changes to the shape.
It is also deeply recommended that you keep the "Mirroring" options set to the X Axis.
You can find the mirroring options on the upper right side of the window during Model/Sculpt mode.

Some parts of the mesh may not behave with mirroring, so be aware that it will not always be as expected. You can force mirror behavior by enabling the 'Topology Mirror' checkbox inside Blender's mirror options, but beware of unwanted results.
- You can add more sliders for your custom offset with the (+) or to delete with (-) icons.
- You can move them up or down in the list (Which will take effect in FVNE) with the up and down arrow buttons.
¶ Shape Naming
Each new shape that you add to the character has an important feature to their naming.
When you add any new shape, name it, and import the custom offset to Fvne and use it, you will have that shape appear in the Custom Offset as a slider during editing.
With a few naming tricks and features, you can change where the shape is used.
- While in blender, you can add shapes to exclusively be in FurryVNEs pose mode and Interactions with the naming convention "ue_".
For example, you can name a shape ue_angry, ue_smile, etc. The "ue_" needs to be in lower case letters.
Also, ue_ stands for "User Expressions". - You can also group the expressions and features with / symbol.
Example: ue_Eyes/Close, ue_Eyes/Angry
The grouping will appear as such once imported into fvne:

- Shapes that do not have a naming convention will appear as "UserTweakables" within the custom offset section during editing in Fvne.
¶ Import into FurryVNE
Make sure that once you are done with the custom offset editing in blender, that you save the blender file once before importing to Fvne.
This is because when you re-export from Fvne to Blender, it will not take the expressions back with it it. So any changes you make to the custom offset can then be continued in the blender file instead of re-exporting from Fvne.
To import the new custom offset into Fvne:
- Select the model in Layout Mode
- Select Export on the FurryVNE plugin within Object Data Properties (Next to cloth export, above Shape Keys by default)

- A new window pops out, Name it and Save it in a folder where you know where it is. (Continued recommendation In a file called "From blender" next to the "From Fvne to Blender")
- In Fvne, upper left menu bar, Import > Custom Offset and choose the new blender exported furryvne_offset file.
- In the Outliner, Advanced > Custom offset, click on the Data box and choose your custom offset.
- Do not be alarmed when the shape of the character is extremely broken looking from what you edited.
You will notice that it does not take the shape of your character for now, that is because the shape might be adding on top of any bone and inflation edits that were made in FurryVNE. - To reset the bones and inflations, click on Reset bones & shapes.
This will put the values of Bones to their default, and any other extra shape. This reset does not consider the Inflation values found in Body > Body Type > Inflation.

Important Notice
As creative as one can be with custom offsets, know that without the correct Limbs, Head and Gender of a character, the custom offset is likely to not behave as you expect. The custom offset that you have used for your character is likely only going to behave as expected with the correct selection of limbs that the custom offset was made with.